qReveal has advanced scheduling features that allow you to automatically show and hide menus or price lists during specific days of the week and times of the day.
By default, all menus or price lists are set to be always visible.
Common uses
Here are some uses for this feature:
- Automatically hide your lunch menu so guests can’t see the different prices
- Likewise, hide your dinner menu if it has items that you don’t offer at other times
- Control when your happy hour menus appear
- Only show brunch menus on weekends or Sundays
- Check your timezone
- Before working with this feature, be sure that your timezone is set correctly under each location you have.
Adjusting your schedules
To adjust a schedule for a menu or price list, first click the Menus or Price Lists link on the admin navigation menu. Then find the menu or price list you’d like to edit and click the Edit button.
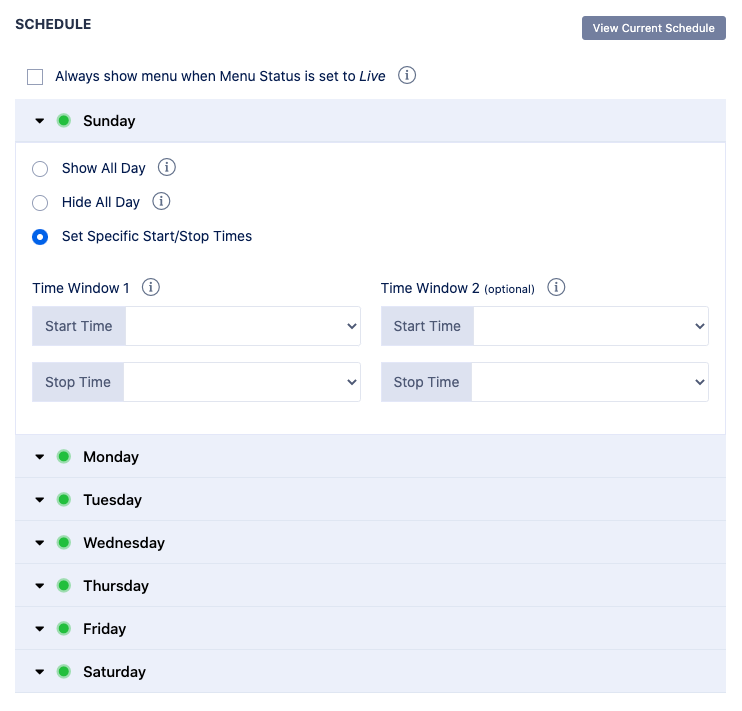
Look for the box labeled “Schedule.” By default, the option reading “Always show menu when Menu Status is set to Live” is checked. This means that as long as your menu is live (and not draft), it will appear on the main page of your location page.

However, if you want to customize the schedule, uncheck this box.

When you uncheck this box, you’ll see an expanded set of options, as shown above.
You can see each day of the week listed and can click each one to expand and select these options:
- Show All Day: The menu or price list will be visible for 24 hours starting very early in the morning (around 12:01 a.m.) on the day of the week
- Hide All Day: Do not show this menu or price list at all this day of the week; again, this will hide it for the 24 hours that make up that day
- Set Specific Start/Stop Times: Indicate specific time windows this menu or price list should be visible
You can configure different options or time windows for each day of the week. If you’d like them to be similar each day of the week, you can simply repeat the same settings as needed.
Here’s more about using time windows:
- On each day of the week you can indicate up to two time windows (“Time Window 1” and “Time Window 2,” respectively)
- Start time is the time that the menu or price list will become visible
- Stop time is the time that the menu or price list will switch to no longer visible
- If you’re using this feature you must enter a start and stop time for at least Time Window 1
- Time Window 2 is optional
Notes about scheduling
- You can select times in 15 minute intervals for both times before noon (a.m.) or after noon (p.m.)
- Menus or price lists will become visible or no longer visible based on our severs’ time; this is aligned with the atomic clock, but, as with any timekeeping, this may be off slightly
- In addition, other server settings and processes can cause times to be off by a few seconds or so either way
- There is also a possibility that a user could, as an example, scan a QR code and request a menu just a few seconds before your designated time and not see a menu or price list that should be visible (or vice versa); in these cases a simple refresh should to the trick
